Pages

29 April 2013

Scratch-building steps

A quick update to show the signal box steps I scratch built last night. Evergreen square section (0.40x0.40") for the posts and rails, and strips of 0.20x0.80" for the steps and sides. The landing sections were cut from 0.40" sheet. It doesn't quite sit square, but for a first attempt at building steps, I'm more than happy with it. A little light sanding will now follow, then a dusting of grey primer before painting.
You'll also notice a bit of dry brushing has occured on the roof to pick out the tiles, and also the cocktail stick and masking tape stove pipe has had masking tape flashing applied (still to paint)

just through the door, you can see the foamex stove that's fallen over...

The door is still a work in progress. Still not happy with this version, although may just fettle this one to fit now


26 April 2013

What's this? A new update from Lee?

Well it's been a bit of a no progress slog of late as I've documented roofing disasters with both station and now the signal box. I realised that my slates on the 'box didn't overlap the edges enough for them to make the guttering look realistic, so off came the roof and a better one was constructed.

The station? I've got that back to the point it was before I ripped the whole roof off in anger (well not the whole roof, just the sagging one) and have strengthened it all with plasticard. I'm just going to have to work out how the guttering works out around the building before I commit to starting to tile... so an update on the station will be forthcoming once I've got the roof slates on.

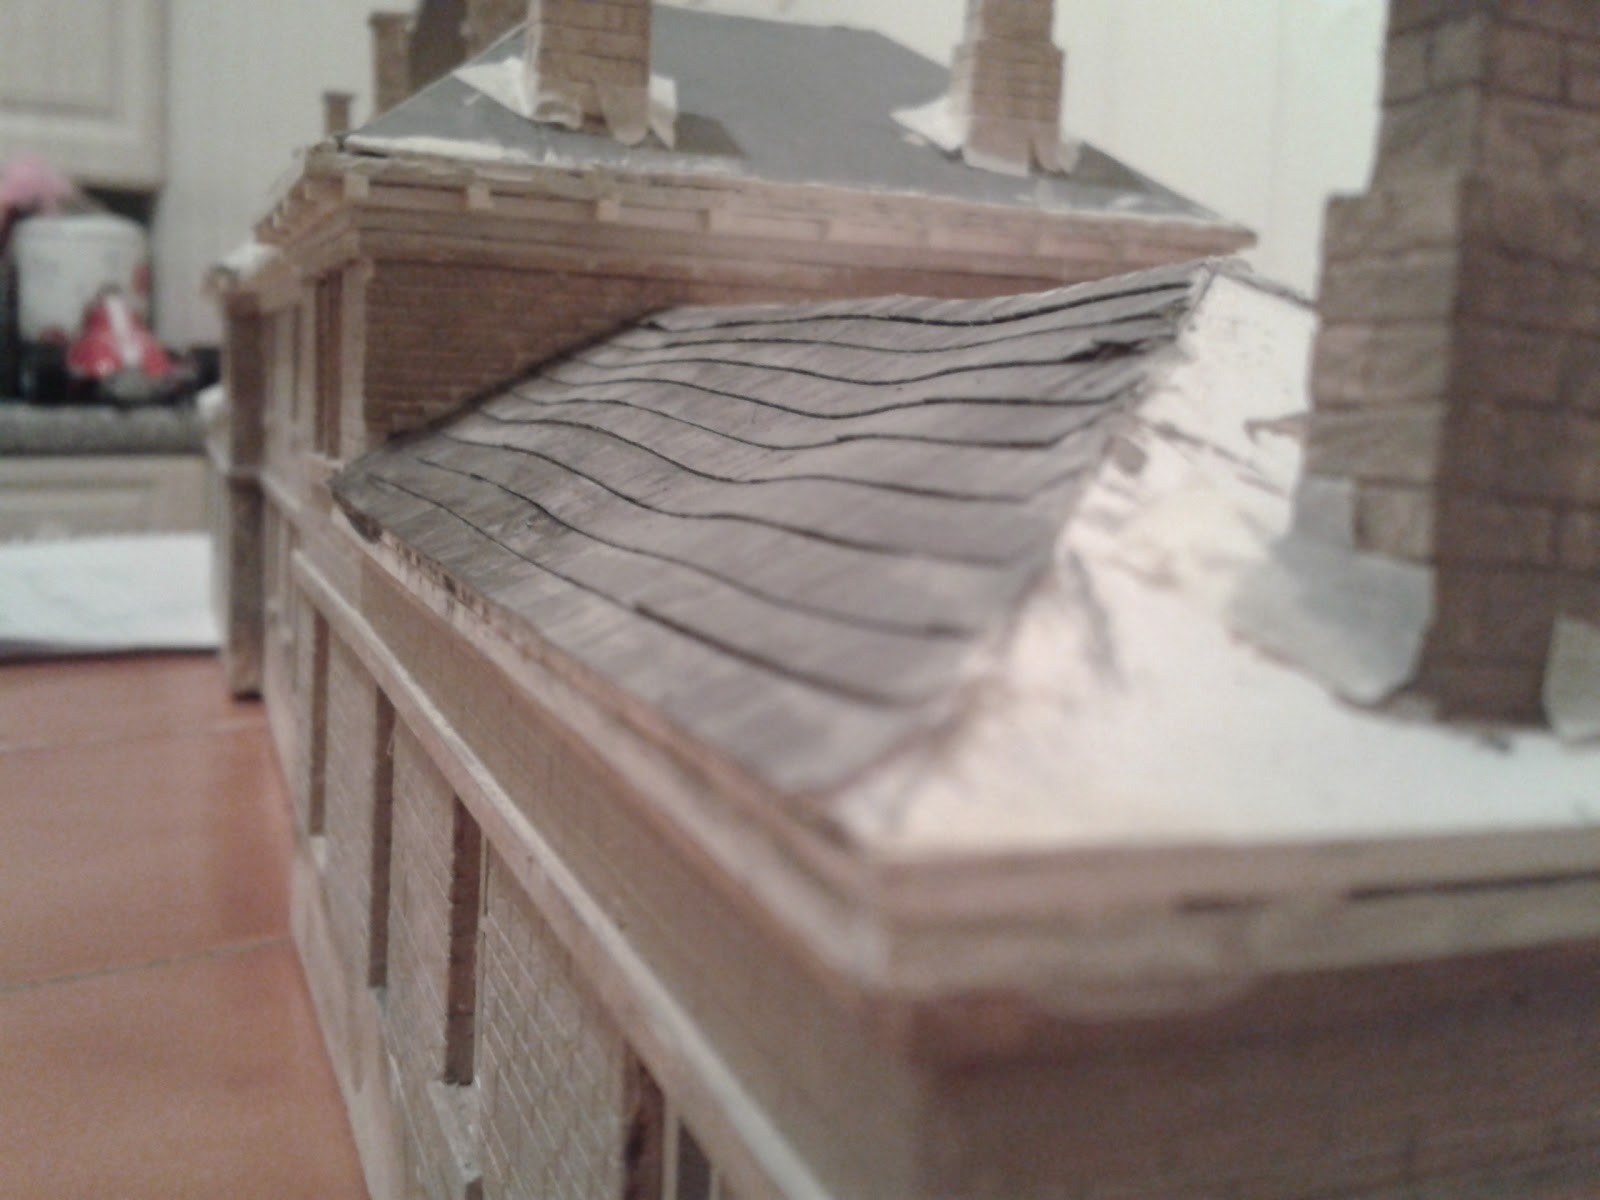
As for the Signal box - I completely rebuilt the roof, making it a complete removeable unit and giving it a dusting with a tin of aerosol primer (after handmaking the guttering from Evergreen Half round and gluing on 1mm strips of 10thou plasticard for brackets - a most satisfying exercise.

The completely rebuilt roof complete with tiles from 150gsm paper and  guttering from evergreen half round. Note shoddy red paintwork overlapping onto cream and lack of front windows and doors. I tore these out due to them not being quite right

 The stone base is painted and finished now, and I'm almost done with the cream and crimson, but not too happy with the oversplash onto the white window frames. In Hindsight I shouldn't have been so hasty to fit the windows and painted the frames first.
 A bit of weathering added to the cream paintwork and two battens affixed for the telephone insulator pots. Roof painted grey, but the paint has filled in some of the vertical tile edges, so I may go back over with a sharp scalpel, just to define the tiles a bit more. Windows are now back in the front, but no door, and you may have spotted it - still no steps...

I must admit to guessing where the stovepipe went, going for centre rear, and drilled a 3mm hole squarely through the roof, before installing a cocktail stick to serve as the pipe. I wasn't going to detail the interior, but closer photography shows the inside too much so I have for now given it a basic interior cladding, with further detailing to come

Inside the box. Not looking too bad, but that window there is annoying me again. I'd better not peer too closely at it from this angle, or I'm likely to go insane.
 So, so far, pretty happy with it - still loads to do, not least build the steps, but I think it's going to look right at home on my layout eventually.

Signal Boxes are fun...

*edit*
AND NOW - OVER 3000 VIEWS! ( yes I know a lot of them are spambots, but still I thank all you humans for reading :) )


18 April 2013

Disaster Strikes

I've spent some considerable time cutting strips of tiles from thick paper and nicking in all the vertical tiles, then sticking them to the cereal box roof base. I started gluing with slightly diluted pva, then the roof started to warp, so I switched to neat pva.. it was still warping, so decided it would just have to be a slightly in need of repair roof. I proceeded to stick the tiles on the other side down with double sided tape - Result - a non-warping roof. Great!
I then decided to try a test paint on the flat roof tiles.... The result is as you can see below:
The previously flat roof, now severely warped.

The first side, slightly warped from gluing, but as yet unpainted. Gratuitous Bailey shot

The upshot of this test is I've invested so much time in this model so far and I'm rather exasperated. If this was a rustic barn or row of cottages, I'd be tempted to leave it, but this is a quality building and frankly should have a solid, straight roof, so it's all going to have to come off, chimneys and all to be replaced with a stronger substructure. At least if I take it off carefully, I'll have a cutting template... Watch this space...


On the plus side, I have been having a lot of fun with the Signal Box and the roof of this baby is a lot stronger. I've used 2mm foamex superglued at right angles. This gives a nice deep bargeboard effect at either gable.  The tiles were made in the same way as above, but glued on with neat PVA with no warping disasters...
photo in daylight taken indoors due to high winds outdoors.

That middle window post is a bit wobbly. I'll have to sort that out. Foamex roof stucture has been sanded to right angles (or there abouts) to give a perpendicular edge to affix guttering to.

All in all I'm rather pleased with it so far, and what started out as an starter exercise in using Wills sheet has slowly transformed into a potentially usable model. It's not in the LMS style, but who cares? ;)

16 April 2013

A Diversion Signal

Whilst I'm still well on with the construction of the Station building, I thought I'd have a little modelling diversion to make use of some Wills stone sheets I got a while ago and have a go at a signal box... It's based the brilliant model of Cowes by the ever excellent Iain Robinson but with the Farnley Burton twist of having a stone base. I could have built that quite easily from pvc foam but I wanted to try conventional methods and must admit the results are very pleasing, especially taking time to mitre the corners with some fine grit sandpaper stuck to a block. The frame is foamex (of course) and the windows are the old cut vinyl method  alhough I had to go to just one layer due to the small size and fiddlyness aspect. I made the overlapping boards from strips of thin card, overlapped and stuck together, then recessed in holes in the wall sides. The roof is only temporary at the moment as it's in position just to see how everything is looking. After much soul searching I think I'm going to be painting this (and the station building) in LMS colours, with white on black name and running boards...


09 April 2013

Station Update 2.1

 Just a quick update to show more windows and doors fitted and the roof base layers fitted for both bays.
Just 3 doors to fit on this side


and 6 windows to fit on this side - note the opened main door :)

07 April 2013

Station update 2

Well, this weekend has been most fruitful in terms of modelling, following a re-roofing incident on the main building. I decided one of roof sections wasn't sitting quite right, so in true Lee fashion, I ripped it off (carefully of course) and cut a brand new one, fitting it so the apex was this time straight.
 I then got into the flow and spent the next couple of hours finishing all the architectual roof edging for the two bays and fitting windows so that the roofs could eventually be glued in place.

Walls have been given a new darker brown undercoat with a view to washing the mortar colour in later. Mixing the colour was a pain as I discovered the drawback to using Emulsion and Acrylics mixed together - it dries in next to no time - great for the model you're painting if you want to dry brush next, but not so great for the paint you've just mixed as it all dries up rapidly in the palette. This resulted in multiple mixes for the whole building (very time consuming). The next stage will be to alternately dry brush in some lighter and darker mixes to get a good representation of Yorkshire Stone.

Getting even more carried away, I've remade the steps leading to the main entrance and added in some side walls -I've not decided whether the centre should have iron hand rails as the prototype, or go for a central stone wall to match the outsides -thoughts anyone?

Given a darker undercoat and the roof supports glued in place. All architectural moulding under the roof line cut and glued in place. Station entry steps and side walls fitted (as yet unpainted


An unexpected bonus also arrived today in the form of a suitcase full of modelling odds and ends from my Father's partner. It's full of bits of card and to my great delight, some sheets of plasticard, not to mention some Wills random stone - I've just got to make a tiny something out of that, just to try it out.
The box of goodies
Almost as if a gift from the Gods, within that box of goodies was also a small, Station-sized quantity of sheets of roof tiles, just perfect for my station. I was going to hand cut them from paper, but hey, when you're gifted the perfect material, why not.... (I'm now seriously looking forward to doing the roof!!)

incluing a sheet of Wills random stone and a couple of sheets of unknown roof tiles - perfect for the station

04 April 2013

Roofs and Wonky Chimneys

Well, since the last update, I've finished the chimney stacks for the main building and stuck down a basic  cereal box card initial roof covering - it's not the neatest of jobs, but after a bit of fettling and covering with tiles, it doesn't really need to be. For the purposes of a slightly more photogenic update I decided to give it a quick coat of grey, not that it needs it, but it starts to look more like a foor rather than a load of card slapped together. Also rather late last night when I really should have been in bed, I started to give the trackside face of the building a brownish stone dry brush as a first coat. Tempting as it is to try and create a clean stone finish as the buildings tend to look these days, I'm going to grime it up to match the Waiting room building made earlier, as I think it gives the model so much more character, plus you can actually see the mortar courses, and after all those hours ofscribing I sure as hell want to see some mortar courses!!
I waited until the light of day to take it outside this morning before setting off for work and getting some decent daylight shots.

Ignore the wonky chimney at the back, it's just balanced there at the moment.

Also ignore the wonky windows, I've so far only made a few of the many needed and was just test fitting with blu-tac. The Station is now for the purposes of photography, seated behind the soon to be scrapped platform to give a sense of location


02 April 2013

Roofing and Chimneys

Just a quick update this morning on the slow progress. I went to the York Model Railway Show yesterday with my lad and had a great time perusing the exhibits and drooling over the trade stands - I could have spent an absolute fortune. It was a great experience seeing all the  available products out there - I had no idea! I could have bought some cast chimney pots and my son was getting a bit bored as I dithered - at £2 per 4, they weren't at all bad, and had I been a bit more flush I would have got them. In the end, what I really wanted was a pack of Evergreen half round to make some gutters, so I decided I'm going to carry on with the plan and make my own pots. The Evergreen was picked up from the brilliant Eileen's Emporium stand, along with a bargain 150g pack of DAS for £1.. Going to have to build a small hut or something, or maybe save it for some dry stone walling...

Anyway - on to the Station.. I've made all 7 chimney stacks (albeit making and fitting the pots, which I'll do as final detailing to avoid knocking them off) and started to fit them to the roof.
Initially I'd planned to fix them to the flat roof base and then fix the sloping roof around them. This was proving to be a little tricky, so in the end I ripped the stacks back off (ripping being the operative word as I'd glued them in with that traditional modeller's medium of NO NAILS), but not before marking the angle of the roof, and the cut the slope off the stack, to glue flush to the slope. I've so far made the full roof for one of the bays and started the second, using cereal box card as the base.
The full building with the in-progress roof. Note the thumbprint on the interior wall of the right bay painted grey to darken off the interior prior to fitting windows. Guest appearance in the background by Bailey the Cat

Terrible Camera Phone photography post midnight in bad lighting... Chimney stacks in background yet to be removed and cut - stacks in foreground having been cut and glued onto roof. This section, barring a little filing is ready to be tiled.