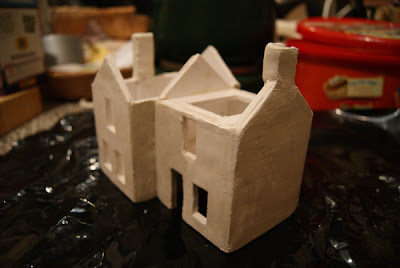
The superstructure is comprised of 2mm foamex, a material I have in abundance due to offcuts from where I work. As per the printed version in the last post, I drew up the elevations in Illustrator, this time amending the Station Master's house to include an extension (this was to prove a tricky option in terms of the roof, but more of that later) and then cut out the sections using a sharp scalpel. The walls were glued together using multipurpose glue and left to dry. The extension part of the building was made as a separate structure using the same method.
Next came the tricky part -the clay... Now I'd never done this before, so after getting a cheaper alternative to DAS from a hobby store, I rollered a piece flat, using the wife's best marble rolling pin onto a taped-down piece of grease proof paper. Once I'd got a reasonable thickness of clay, I then glued one face of the building and laid it down over the sheet of clay. The outline and window apertures were then trimmed out and the same was repeated on the other three faces. Once both buildings were clad, I postioned them together and gently pressed together to dry.
In the morning I discovered the walls were terribly cracked and in some cases peeling away from the foamex. What you see above is the second attempt after peeling the lot off and starting again. Even then I suffered severe cracking and what you see above is the slighty less cracked version following two night's worth of damping off and smoothing over then allowing to dry..
Eventually I resorted to applying ready mixed filler thinly coated over all the cracked areas which seemed to do the trick.
A little trimming with a sharp scalpel was then required once dry to open up the window and door apertures again, followed by a little light sanding with some rough grade sandpaper to give a bit of added texture to the stonework. It has to be said I really struggled with cracking on this project - I suspect it was the cheaper clay coupled with the substrate I used that caused the issue, so next project I will change the materials to see if that makes a difference. With the materials I had though, I persevered and with a bit of time and effort, filling smoothing and waiting, I got to where I wanted to be, next was to come the fun part - the scribing...
This was the initial stages having roughed out horizontal block marks. It was looking a little too regimented, so I added an alternated slimmer course of stone :
At this point, it's really starting to come on and look like actual stone blocks. I carved the lintels into the clay to lie flush with the stonework, and glued on strips of 1mm thick foamex to serve as window sills.
The actual carving, whilst very satisfying, was quite time consuming, taking up 3 or four snatched evenings, often accompanied by the distant calls of "are you playing houses again" from the wife in the next room ;)
A bit of natural light outside really enhances the model and at this stage I'm really enjoying myself. The roof base layer is on loosely at this point. The angle of the pitched roof was worked out using paper templates. It doesn't matter at this point if the two roofs don't join as the leading and tiling work will cover any gaps.
Roof tiles now fitted, bargeboards and guttering glued on and painted. There are still a few minor points of detailing to add such as chimney pots and downpipes, but this is pretty much completed now - it's good enough to go on the layout as is, but I've another 2 buildings to add yet..


Thank you very much for the namecheck! (blushes) The models look extremely good and I am looking forward to many more blog posts!
ReplyDelete