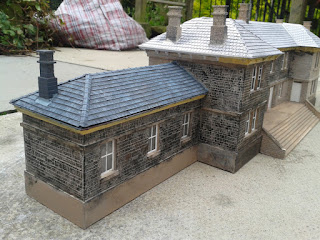
Just a quickie, so you know I haven't lost sight of the Station... Tiling has progressed on the roof and is complete on the right bay, with just the chimney to repaint, after i'd got it covered in primer...
I was struggling a little to get the tiling to overlap the roof enough for the guttering to sit right, as I'd intended to fit the guttering after but then I figured that it was a lot easier to fit the guttering first, then position the first row of tiles on top of this. Painting the completed portion of roof was a lot of fun and comprised an undercoat of cheap Poundshop grey primer, washed over with dilute black acrylic, then dry brushed with a mix of grey and magnolia emulsion with some blue artists' acrylic mixed in to give it that Slatey tinge..


It's looking absolutely splendid, Lee. The colour of the slates look great and on my computer screen the stone work looks just right. I like the ridge tiles by the way. How did you do those?
ReplyDeleteCheers, Chas.
ReplyDeleteRidge Tiles - sheet of 10 thou plasticard - measure strip of 2mm, score, measure a further 2mm - cut (with sharp knife, and slowly) - then bend to angle (again carefully to avoid snapping)
For the ridges, I trimmed a 1mm wide sliver of 10 thou and cut it to small 6mm or so pieces, then painted solvent onto one side of the ridge, and onto the strip and tacked the straight piece on. Once all the pieces were on and dried, I painted more solvent to the other side of the ridge and the undeside of the sticky up strips and then folded them down onto the glue, holding until set. Quite effective I think...
If you think it's to dark, dust the tiles with talc. This will lighten them a bit and unify the colours a touch.
ReplyDeleteIt's looking superb, Lee. I like the colours, you can see this is a real-world railway station weathered by time. The result with the guttering is really good, I think.
ReplyDeletesorry i think you are being too critical of your own work, something we all do. It looks very, very good to me. However your own doubts will nag away at you so take the talc tip.
ReplyDeleteIs this really OO scale it looks bigger but could be the camera angle
john
Thanks, Phil, I might try that... And Mikkel, thanks also. I was worried I'd overdone the black, possibly I have but I've been encourage by both the response here and also on RMWeb
ReplyDeleteThanks John, I'll carry on as I was, with maybe a dusting of talc. And yes, it really is 00.. I'll try and take a pics with something for scale next time
ReplyDeleteThis is looking superb, Lee and the walls aren't too dark. The roof is really convincing. This is going to be a masterpiece, I am looking forward to seeing it in context (he mischieviously hints...)
ReplyDeleteThanks Iain, I'm really pleased about the way the roof is going. All work has halted on this aspect, as I've run out of Evergreen Half round and was putting the guttering on first to give something for the first row of tiles to line up with...
ReplyDeleteYou might be dismayed to learn that since this photo was taken, I've repainted the walls, got paint all over the window frames, removed all the window frames and had a further 2 attempts at painting the stonework. I'm still not convinced. I thought Mark IV of the soot-blackened walls was at last it, but after taking a week off in Northumberland, I've come back to it and decided it's still not what I want. In a way, I wish I was trying to recreate the grey stonework of your location, but I just cannot seem to capture soot stained Yorkshire grit exactly as I want it (at least not this time anyway)
Watch this space though as I'm not giving up. (I've also since learned that white paint was not readily available in the early 60s, so the windows will be coming back in cream... but not until I've sussed out the stonework!
How's it going Lee? Are you winning?
ReplyDeleteHi Chas, I've scrapped thge initial paint job on this and since removed all the windows...blog update imminent...
ReplyDelete