Pages

17 December 2014

Dover Priory Signal Box - A bit more detail


There I was, merrily building a signal box for myself, when all of a sudden I found myself offering to build a modern-day signal box for a fellow model rail forum member - he'd pay of course, and provide materials, so off I set.

He sent me a wealth of current photographs as he only lives but 5 minutes away from the prototype, and I had phopgraphs from every angle imaginable, winging their way to me via the internet.

I started of course, with my trusted foamex shell, selecting 2mm thick for the purpose of bracing, and then wrapped this with Embossed brick plasticard (SE Finecast Flemish Bond), and there was the brick base complete. Lintels and cills were added with pieces of foamex, let into channels I'd cut in the plasticard/foamex


To fix on the brick sheet, I used a long piece, cut to the height of the base, and then fixed it in place a side at a time with a PVC weld adhesive used for fixing pipes together. Once one face was stuck, I scored down the back, and folded it around the foamex shell and glued it in place. The sheet finally joined at the back, where I figured the seam wouldn't be too noticeable as the model, when in situ on my customer's layout, will be but an inch or two from the back scene, and not visible unless it's picked up.


Windows were constructed by printing out the window frames onto signwriters vinyl, then sticking the complete unit to a piece of thin clear pvc.

I devised this method when building the signal box for my own layout, which has been put on the back-burner...


This one is a bigger frame, but what I've done is stuck the cut vinyl windows to the pvc, then added styrene strip (40thou x 40thou) around the frames to give it bulk. The whole window unit is then cut out, and affixed to the base, with 2.5mmx2.5mm strips as corner posts.

Unfortunately I didn't take many great interim pictures of the build, but here's a quick ref pic I sent my customer from the dash of my car, whilst I was waiting to go to the Dentist's. Here I've added a roof from foamex, tiled with individual pieces of paper, added guttering and bargeboards, and started on the lean-tos...

The lean-tos were made from plasticard, scored to form planks. I tried some Wills Boarding, but it was just way too thick to deal with.


For the security screens, my customer had got some etches from  Shawplan - a bit big in scale if truth be told, but I figured (and he agreed) that you wouldn't see the mesh at true scale, and for what it was, this was a great representation.

I tried the raw brass versions for size before emailing for approval.

Approved they were, and were given a fine spray with a grey enamel from a Rattlecan

I made up a framework for the door screen from thin styrene strip and glued it to the mesh with Solvent, before spraying the whole thing, and it was then glued in place with some 40thou strip for beams. The lean-to roofing felt, seen here is masking tape fixed on to a piece of 30thou plasticard with the aid of some MEK to help it stick more permanently.

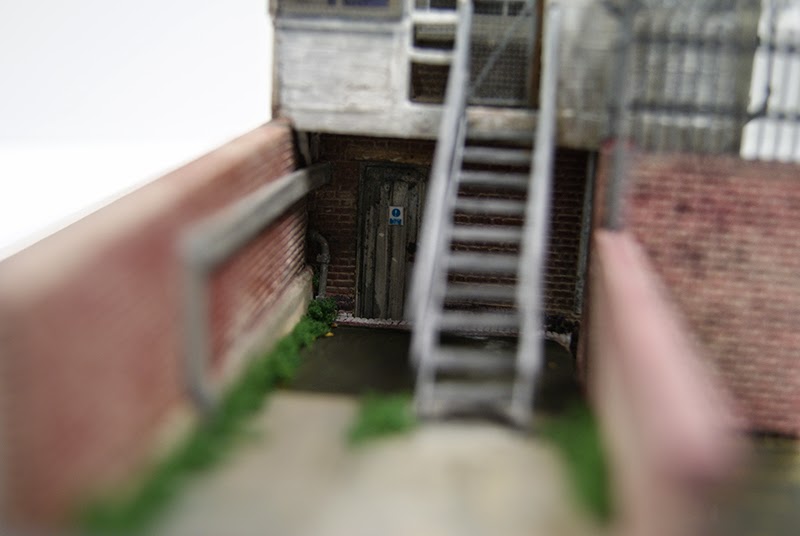
The steps are scratch built from rod and strip, whereas the security fencing is a proprietary product sent up by my customer, as is the barbed wire


The roof was given a coat of grey emulsion, before several washes of black to pick out the individual tiles. A lighter grey dry brush followed to bring out some weathering highlights. Finally some moss and lichen was added by first dabbing spots of green/white and then dabbing pva in along the roof line and down both pitches before adding moss-coloured flock.


The pipework was an absolute bit of indulgent fun, as it will never be seen from its backboard location!


Extra detailing included pipe trunking and a warning sign for the padlocked locking room door - again not seen unless you stick your eye up to the steps...


And finally a demo shot put on to a hastily cobbled together temporary platform to give it a sense of  location

talking of which, just as I'd photographed the model, mu customer posted up a near identical angle of the real thing, so I just had to photoshop it in...


18 September 2014

Finished Bridge


It's been a couple of days now since I posted this off down South to my customer, but he recieved it intact today, so I thought I'd share the photos I sent off to him before posting it.

Following a number of paint coats, I finally decided on an atmospheric green tinge to the stonework witht the mortar showing through quite markedly. This was achieved by firstly painting with an overall base of Wilko's "Safari Sand", followed by a thin wash of Humbrol Weathered Black, then a wash with some artists acylic green added in. Then a light wash of the safari sand was run over the mortar joints to bring out the mortar colours, before finally dry-brushing with a black.green mix.

The right hand edge of the bridge was to go to the basebaord edge, so I built up a landscape base using foamex formers and some blue cloths glued on with UHU and then plaster of paris painted over the top. A brown emulsion base was added to give a starting point for the scenic work. The opposite side was a different matter, with me having no idea of the scenic landform, so I have left blank and open for the hillside to marry up to it.


I would have liked to add a road surface to the deck, but as I was sending it as a separate piece I decided it would be better to leave as a blank canvas, especially so as the client's budget didn't run to the additional scenic work ;)


Today, I also got sent this (unfortunately dark, but atmospheric) shot of the bridge in situ in my customer's loft..,


unfortunately, whilst being absolutely delighted, he reports that due to a slight technical hitch with measuring, the deck is a tad too long. so it's on its way back to Huddersfield for a little remedial work...


10 September 2014

A Bridge So Far...


or.. Bridge over the Triple Track (for that is what this will be)

Recently, I was very pleased to be given my first ever modelling commission following the sale of a couple of double track tunnel portals that I had no room for. There was nothing wrong with them - it's just that as I'd made my track layout 4 wide, I simply had nowhere for them to go and so I playfully offered them for sale on a model rail forum, and they were duly snapped up.

That same buyer then, some time later, asked me if I could build him a plate girder bridge to traverse 3 three lines acting as a scenic break at the start of his storage area, and I jumped at the chance (I've always wanted to build a plate girder bridge).

Much to-ing and fro-ing was done with measurements and photographs via email and eventually I arrived at a scale plan of the track area so I could work out the span width. Because it's going on a slight curve, I figured that a slightly skewed bridge would be the order of the day.

Even though the bridge is a scenic break, the storage area is also scenic, so I was tasked with making both sides. Strangely enough - the first part of this build was the 4 wing walls which I already had a drawing for.  These were all hand-scribed onto 3mm foamex and then followed the abutments - again from 3mm foamex.

I decided to add a little extra detail on the corners and I did this with some 20thou plasticard, cut into 8mm strips and stuck to the foamex with a generous dousing of MEK. Once set, I marked in where the course lined up from the scribed stonework, and then cut out the excess. A generous dousing of MEK at the corner join helped weld the two strips together and again, once fully set, I scratched in the courses with a sharp scalpel. In the end, I think above and beyond the call of duty for the budget, but I believe in quality and I think the extra detail makes the difference.

You should be able to see here the corner detail here of the raw foamex and plasticard quoins. This is a later picture in the build progress after I'd constructed the girder deck
Once the stonework courses had all painstakingly been scribed, using my trusted method of set square and dart tip, I then worked up the texture of the stones, again using the dart tip, but instead of scratching in lines as such, I pressed the edge in to emboss detail.

I won't say this method is very quick, but it's very therapeutic and I found myself picking up a buttress or two to continue scribing whilst waiting for the kettle to boil - any excuse to be in the kitchen!

The next step was the plate girder - which I was quite excited about - made from Wills' excellent Vari Girder pack. The panels are crisply moulded and once cut off the fret, fit together nicely.
I'd found a reference to their measurements online for my drawing and once I'd got them out of the pack, I found that with 12 panels per span was just the ticket. It's a good job I'd bought two packs as each span took 24 panels.

I then set aide the completed spans to form the bridge deck. Now my customer's budget didn't run to fine scale representation of under bridge detailing, so I decided to represent a passing notion of the supporting girders by fixing on 6mm wide strips of 30thou to the underside. The edges of this would then glue to the edges of the vari girders to form a strong plastic weld.

Picture the scene - it's now 11.30pm and I'm getting tired and thinking of bed. I'm very pleased with my ingenious cutting of the strips (allowing a slight recess for the edges of the vari girder panels to butt up to, and so it comes to test fitting the deck before gluing onto the girders. What's this? Oh you fool! you've only glued them on to the wrong side (being a skewed deck, it matters!)

A resigned sigh was followed by careful stripping off and flipping over to start again…

The "completed" structure - and now it's time for bed!

As morning dawned, I found that the sides of the deck had dried out of true, but I think I've fixed that with a bit of gentle persuasion…

And so, to the primer stage:

At this point, the plate girders hadn't been primed. But they have now...


Hopefully the next blog post will be the finished thing prior to despatch.

I'm going to have to make myself one next! :)


18 August 2014

The row of cottages - Phoenix from the flames


After my last post I've been working hard to fix the mess that my cat did to the row of cottages I had been building.

This last week. whilst the family has been extreme camping in Staffordshire I 've taken a bit of time to carry on with the row of cottages that my cat so very kindly gave me a kick up the backside to carry on with and having fixed up the end with some pvc pipe weld (very effective at gluing together foamex) I'd got to this stage:


The joints were the foamex had broken apart had married up very nicely indeed and with a bit of touching up were quite difficult to spot, so I was encouraged to continue.
The roof was pretty easy to fix and I thought I'd strengthen it with another piece of 1mm foamex on top of the one that was already there.
What I hadn't figured on was the glue reacting with the thinner materials and after a roof warping nightmare, where the two layers of laminated 1mm foamex turned into the waviest roof you've ever seen, after I'd individually tiled one side! Undaunted I ripped it all off again and replaced it with a piece of 2mm. I was able to rescue the tiled side as I'd glued them to a piece of paper preprinted with a 1mm grid for alignment, which was then fixed on with double sided tape, and this I was able to carefully peel off the piece of warped foamex. Of course, this then made the gable ends slightly higher which meant a bit of filling and patching, and whilst not perfect, I think it looks OK from a viewing distance.

Here's the new gable end


I could have glued barge boards on to hide the join, but I wanted to put on prototypical stone end capping, so I hope it comes across as badly weathered stonework ;)

The roof tiles I'm pretty pleased with, having stuck them on individually and being made from a lightly textured wallpaper we use at work for printing wallpaper graphics.
They were stuck on with pva and then given a coat of Humbrol Earth, before being washed over with a couple of coats of diluted Weathered Black and then dry brushed with Wilkinsons Safari Sand. They still need a bit of weathering up with some more black and perhaps gree, but I'm happy enough with them as they are now to leave it until I can get some materials to finish off the downpipes and door frames...

30 July 2014

A row of cottages in the making….

It's been a while since my last post and things have been a bit all over the place as usual. A flurry of activity and then a major stall - maybe I'm losing interest, or maybe I'm just too taken up by other things at the moment to devote much time to modelling. Certainly the nice weather of late has meant more time out in the garden than indoors gluing small bits of plastic to other bits of plastic… :)

In terms of the layout, well I've decided to relay the track yet again, and have gone for a 4 track mainline layout that will cross a viaduct  - an unprototypical 4 track viaduct that has now been built and is in the mid-stages of being painted (but more of that in a later post (hopefully)

Now - back to the topic of the post…

Some time ago in my last post I mentioned the building of a row of cottages and I'm pleased to say that progress has been made


I tried a different technique for this: The elevations have all been plotted with the Roland vinyl cutter - all outlines, window and door openings and all stone courses cut with the plotter.

Following this the outlines and openings were trimmed with a scalpel and assembled with UHU.


With all the courses initially "Scribed" by the plotter's knife, all I had to do then is follow the lines with my trusty dart tip, distressing the rough stones and leaving the cills and lintels plain:


It took ages to draw out the elevations in Illustrator initially, especially the stone courses (it would be easier if it were regular, even blocks of stone as you could copy/paste, but saves a lot of painstaking effort with the set square and greatly reduces the "wonky verticals" I get when scribing the verticals freehand.


I tried to film myself left handed - hence the blurriness… It's also not too easy following the courses with the dart when you're looking through the view-finder….

https://www.youtube.com/watch?v=cPtvBA76xoY

Once over - scribed, I  then took to painting up the walls, using Wilkinsons "Safari Sand" as the base colour and then dry brushing with a brown emulsion and further weathering with Humbrol Weathered Black:


The Windows were constructed with my usual method of making drawings of the separate window elements - the outside frame, the lower sash and the upper sash with frame, plotting them all out on self adhesive vinyl and then laminating together onto clear plastic, then gluing from behind.


Then…

disaster…

One of my young cats got into the garage where I'd left the model, jumped up onto a shelf where I've got some offcuts of wood stored and sent a heavy lump of oak skittering down to the terrace cottage below…


Result:


As you can see, I'd added all the windows, added net curtains and curtains to all the windows and made a start on the roof before this tragedy befell me…

*cue rather deep sigh*

I'm pretty sure this is salvageable, but unfortunately I just don't have the time or indeed the inclination right now, but rest assured, I WILL fix and finish this model - too much time has gone into it to dismiss it to the great dustbin of despair!

In the meantime - here's a hut it took me 2 years to make (and it's still not finished)


28 April 2014

The Goods Shed - an Epic in Photos

Greetings all. It's been quite some time since I posted the sneaky peek of the Goods Shed I've been building for the layout, well, now I've finally got round to posting the full build.

BUT…

In collating all the pictures from the build, I found I had rather a lot of photos indeed, so I thought I'd take a different approach to this post and present to you a photo essay in the form of the 70+ pictures I took in the progress of the project.

It took in some slightly new techniques and involved the by now, regular repaints to get the desired finish, but was a thoroughly enjoyable project indeed.

I hope the photos tell the story enough for you (if indeed you can make it through to the end.


With many thanks to the amazing Iain C. Robinson for providing me with the initial elevation drawings, which I then butchered to make it match in with my existing buildings.


Painting dilemma - bare stone or whitewashed?


Whitewashed was the way forward

Doors and runners all scratch built from foamex and plasticard


Roof trusses made from laminated strips of coffee stirrers. A jig was constructed to aid production


Trusses not proving to be enough, I added extra beams and stretchers


More detailing - adding upright support colums

Crane superstructure -again more coffee stirrers


seems a shame to hide all that woodwork

But open doorways allow atmospheric shots like this


More scratch building -crates from plasticard, sacks from DAS...


individual tiles cut from paper and painstakingly applied


and here's how I did the ridge tiles


What's this? An un-weathered wagon? Can't be having that….


…and so my first ever attempt at rolling stock weathering...


Congratulations for making it to the end :)

I hope this was self-explanatory, but any questions - just ask!