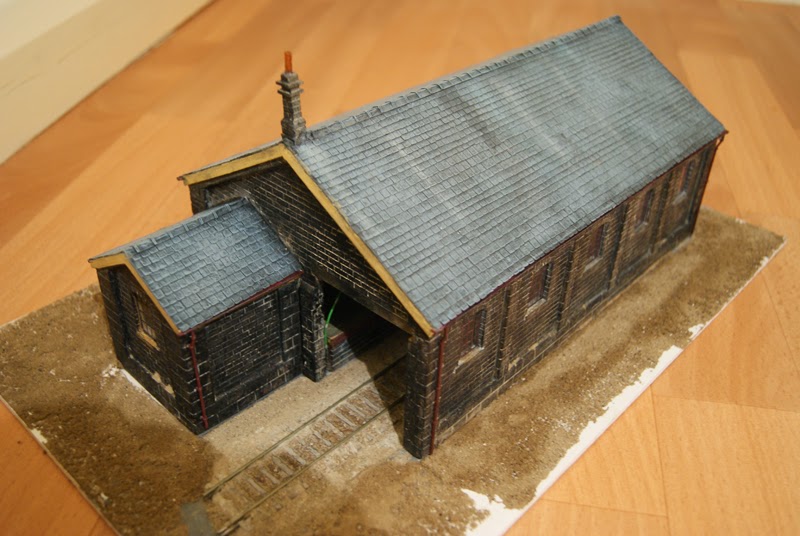
Greetings all. It's been quite some time since I posted the sneaky peek of the Goods Shed I've been building for the layout, well, now I've finally got round to posting the full build.
BUT…
In collating all the pictures from the build, I found I had rather a lot of photos indeed, so I thought I'd take a different approach to this post and present to you a photo essay in the form of the 70+ pictures I took in the progress of the project.
It took in some slightly new techniques and involved the by now, regular repaints to get the desired finish, but was a thoroughly enjoyable project indeed.
I hope the photos tell the story enough for you (if indeed you can make it through to the end.
 |
| With many thanks to the amazing Iain C. Robinson for providing me with the initial elevation drawings, which I then butchered to make it match in with my existing buildings. |
 |
| Painting dilemma - bare stone or whitewashed? |
 |
| Whitewashed was the way forward |
 |
| Doors and runners all scratch built from foamex and plasticard |
 |
| Roof trusses made from laminated strips of coffee stirrers. A jig was constructed to aid production |
 |
| Trusses not proving to be enough, I added extra beams and stretchers |
 |
| More detailing - adding upright support colums |
 |
| Crane superstructure -again more coffee stirrers |
 |
| seems a shame to hide all that woodwork |
 |
| But open doorways allow atmospheric shots like this |
 |
| More scratch building -crates from plasticard, sacks from DAS... |
 |
| individual tiles cut from paper and painstakingly applied |
 |
| and here's how I did the ridge tiles |
 |
| What's this? An un-weathered wagon? Can't be having that…. |
 |
| …and so my first ever attempt at rolling stock weathering... |
Congratulations for making it to the end :)
I hope this was self-explanatory, but any questions - just ask!


An epic indeed - excellent! It's really nice to watch the progression in the build, to sit back and enjoy the flow of creativity...and of course the end result is amazing. Petra was looking over my shoulder and pronounced it "excellent" so there you go, the ultimate seal of approval :-)
ReplyDeleteI thank you, Iain and to you too Petra - Praise indeed :)
ReplyDeleteHope all is well at t'Mill and you're saving up an epic project to share with us yourself :)
A couple of interesting projects which I hope to blog about soon :-)
DeleteIt's been a long wait since you last posted an update Lee but well worth it.
ReplyDeleteIn short it's a wonderfully interesting post showing your techniques and a lovely model.
Cheers Geoff. Next up, a row of cottages...
ReplyDeleteAn excellent end result, and I did quite like seeing the whole build in one go. A different approach to the build report but it worked really well. The atmospheric shots really show of the internal detailing.
ReplyDeleteThanks Mark. I could have written a couple of thousand words about the project in the end, but decided it was better for my brain to let the pictures do the talking. I hope they convey the fun I had with this project, especially the internal detailing bits (which led to a bit of a detailing competition with another modeller over on RMWeb ;) )
DeleteA terrific model Lee. Love all the painstaking detailing work you've done on the interior. On first take I thought those sacks and crates were purchased off the shelf. True craftsmanship. Hope we won't have to wait as long for the row of cottages!!!
ReplyDeleteThanks Chas. The internal detailing bits were fun to do - something you can really go to town on with a Goods Shed. The Crane was made from laminated coffee stirrers, bits of plasticard, wire, cotton and a Lego steering wheel!
DeleteHi Lee, what a great way to watch your superb goods shed grow - almost like a time-lapse film! I've said it before, but your weathering of that van towards the end shows just what your skills will do for rolling stock. Any chance we can tempt you to scratch-build a van maybe? :-)
ReplyDeleteCheers Mikkel. I was rather pleased with the weathering on the van.
ReplyDeleteI've got a Parkside Dundas kit in a box somewhere - I'll have to dig it out and give it a go ;)